Saturday, October 17, 2015

Family Craft Time - Holy Tree Wreath

Last Sunday, together with my husband we had a little crafty activity. For some time I wanted to try making grapevine wreath. I saw once the tutorial on how to make it and it looked easy peasy. Well, as it often turns out, I was trying to do exactly as it was shown and it didn't work this way. The branches were not so flexile as in the video and I had troubles to bend them the right way. Fortunately, I have a very smart man and he came out with his method of making wreath.

My part was to decorate it with something. We have a holly tree in our garden, so I decided to use it - after all, Christmas time is coming soon. This is how it turned out. So, I have my first very own wreath, perfect for Christmas time :).

And what a saving - I have nice decoration for zero spending!

If any of you has grapevines in the garden, then you have to try making wreath. I'll try on some more for sure, maybe next time using fabric for decoration.

Monday, September 14, 2015

Yummy Felt Corn

Wow, my pincushion that I linked to Sew Can Do Craftastic Monday last week is featured today there :)! That's a very nice start of the week. So, let's continue the fun and I'm linking today's post to Craftastic Monday Party as well.


The past week I ended up in working with 4 sewing / embroidery projects, which is way too many with so little time I can squeeze. That's why I'm very happy I finished this one on Saturday. And I realized it took me 1,5 month to finish that! It's felt corn on the cob.

As I already mentioned in one of the posts, I fell in love a bit with making felt food. I made some and my son, Franek, was enthusiatic about it, so it was a very good reason for me to carry on. Per his request my next project had to be corn. I found a gorgeous tutorial on While Wearing Heels blog, where the corn looks like a real one. The way kernels are made is very time consuming but worth the effect.

I had to make some changes in sewing the leaves though. In the tutorial, the corn and leaves are sewn together and Franek wanted them to be separate - after all, you don't cook corn with leaves, so they had to be removeable :). This is how it turned out.

In July I got two books about felt food (and not only) as my birthday gift, so stay tuned for more felt stuff here.

Saturday, September 12, 2015

Cathedral Window Pincushion II

On the previous post I showed you my first try on the cathedral window. I liked it so much that I decided to practice it further with second pincushion, this time with brown and blue combination of colors. Of course I used my scraps to do this one as well.

I think this one will become a gift for my mum. Many years ago when I was in primary school I made heart-shaped pincushion for her and recently she has mentioned it was one of the most useful things I made at school :). She still has this one and uses it, so I believe she'll be happy with the new one.

Oh, and do you know what happened to the pincushion from the previous post? Franek, my 6-year old son, took it and claimed it would be his pillow. Well, I think I'll just go on and practice cathedral window a little bit more :)

I'm adding this post to Show Off Saturday Linky Party:

Monday, September 7, 2015

Cathedral Window Pincushion

Yesterday, I had a very successful day when it comes to sewing because I was able to finish what I started to do. It required the older son to leave the house with his dad and the younger son to fall asleep :).

I did the cathedral window pincushion. It's been a while I wanted to try cathedral window and such small project as pincushion sounded perfect for a start. I found gorgeous tutorial from My Go-Go Life that you can find here on Craftsy. And it's perfect to use scraps. I know I'll have to pratice the catherdral window much more, so I'm more satisified with the result. That's why probably I'll make one more pincushion and then I have a plan to make a pillow using this technique.

I'm sharing this post on Craftastic Monday Linky Party at SewCanDo.


Thursday, August 27, 2015

[WIP] Golden Hardanger Doily

It's been a long, long time since I showed any embroidery. So, it's highest time to change that :). I'd like to show you what I've been working on for some time. It's my favorite, lovely Hardanger. The pattern comes from Yvette Stanton's book: "Elegant Hardanger Embroidery" and it'll be square doily. However, I decided not to use classic white colors, as seen in the book but instead to try this pattern on light yellow fabric and stitch it with dark gold thread. There's a lot to stitch and then cut, so I have no idea when I finish it but whenever I have a couple minutes here or there, I try to stitch. It's a small project so it's easy to take it wherever I go.

The doily will be around 28x28 cm. Materials I use: Zweigart Lugana light yellow fabric (color nr 274); DMC Pearl Cotton nr 5 and 8 dark gold (color nr 783).

Wednesday, July 29, 2015

Tuesday, July 28, 2015

Lavender season - sachets

Recently, there's been lavender season in my garden. By now, I cut and dried all the flowers.

So, it's highest time to think of lavender sachets. I grabbed some fabrics with different shades of violet, I also found some ribbons in my stash. The white with pink border is the one that my mum gave me from her stash so it must have been bought years ago! It's nice feeling when I make something new out of something old that was waiting so long to be used.

At first I made the triangle sachets from this tutorial on Patchwork Posse blog. However, mine didn't come out that good - they are more "wonky triangles" kind :). Probably, one reason is that I used a bit bigger squares than in the tutorial. So, instead of triangles I decided to continue with standard square sachets.

Once I filled the bags with lavender I stitched it around with pearl cotton. Also, it's not seen on the photos but each side of the bag has different fabric.

I'm adding this post to Linky Party on SewCanShe blog:

Wednesday, June 10, 2015

Felt Food - tasty start

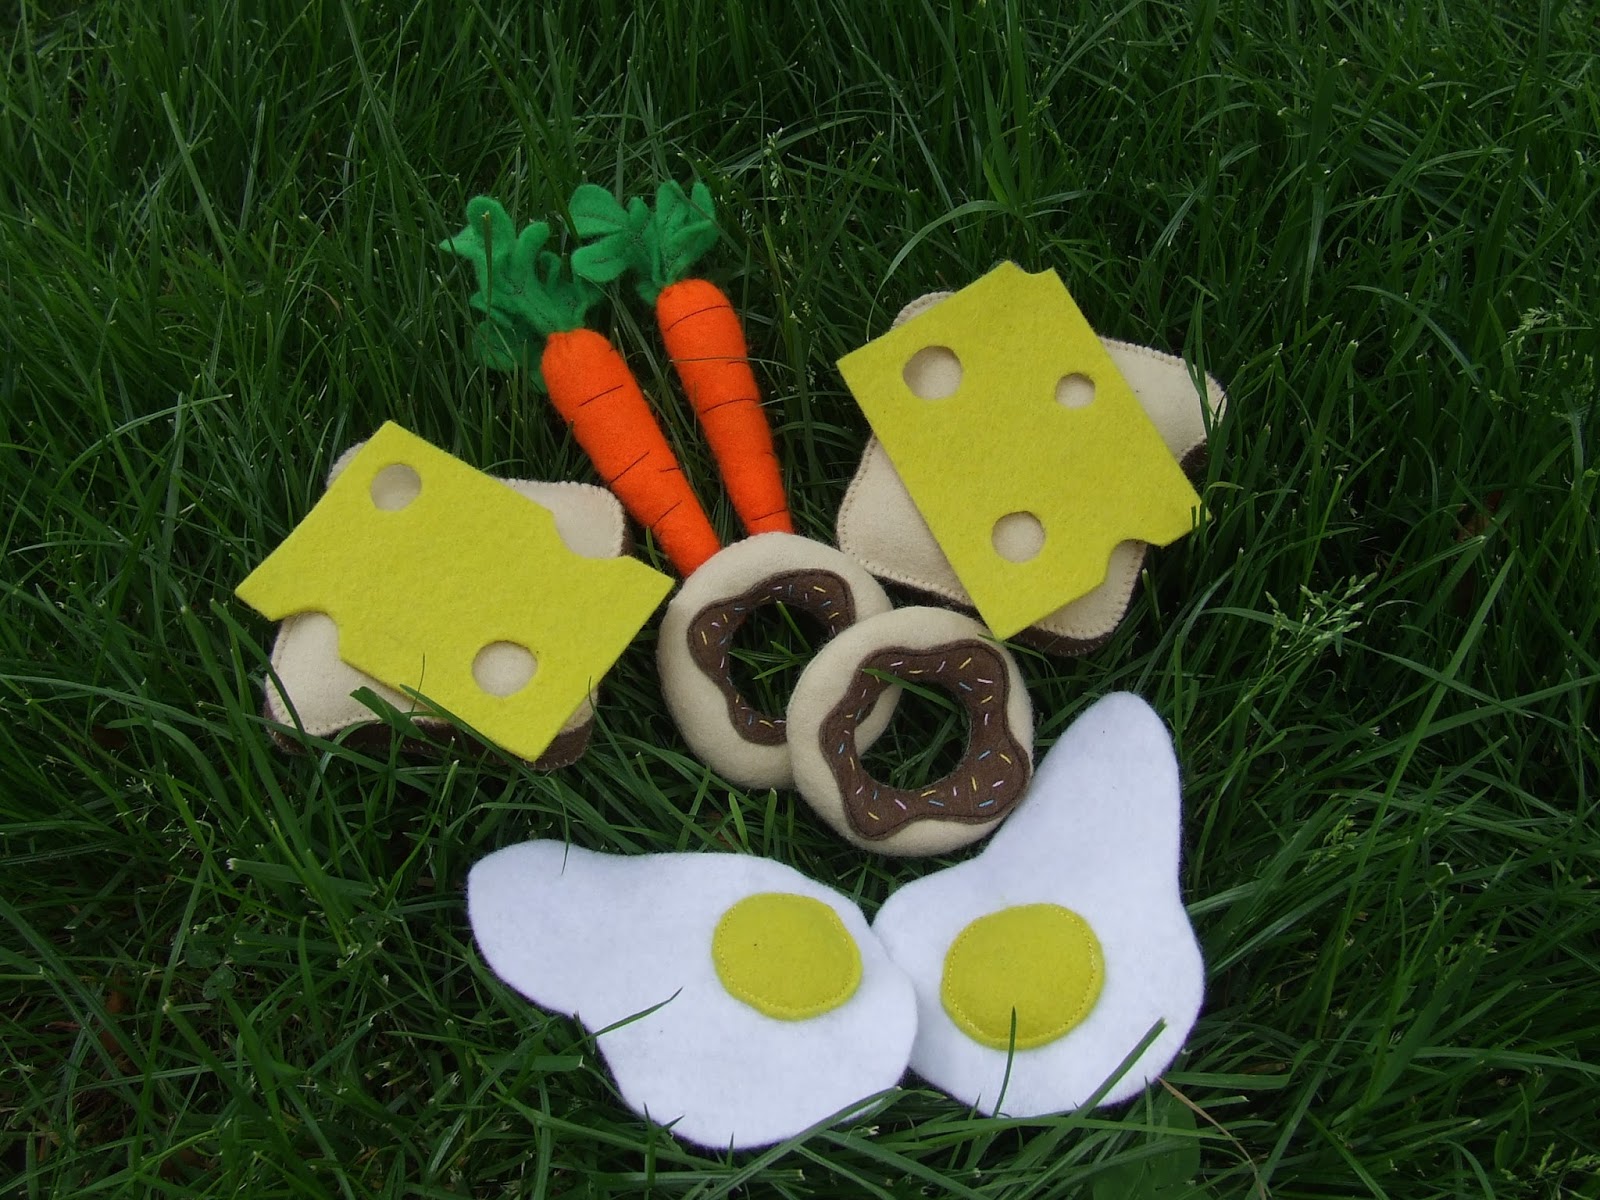
For quite some time I wanted to try making felt food. I thought (and wasn't wrong :)) that this can be fun for both me and my son. Finally, recently I found some time to try this and used a little trick. I showed photos to my son and asked him: "Hey, Franio - do you want to have such for play? I can try and make these". Of course he was all for yes, so I had a good excuse I needed some time for myself and my sewing machine. The first thing we did - as he was helping me out as well, were the fried eggs, then I did carrots. And it is addicting - you try one and you want to try something else. So, the other day I continued with toasts/sandwiches, cheese and finally some dessert (doughnuts) for the end of a tasty meal.

Now, there's one minus - once I made all of this food I had to get rid of the box from my kitchen, as Franek needed something to store his food :).

Currently, I slowed down, as I need some more felt with different colors to make more stuff. I'm planning a short trip to the nearby town and do a little shopping. If it succeeds I'll work on the slice od tomato, corn, banana.....the list will be endless I guess.

Monday, May 25, 2015

Name change

Hello, here's just the short "technical" info. For some time I've been struggling with the fact that my blog doesn't show exactly what it was supposed to. His name was Embroidery Corner and in fact for some time I was sharing here more sewing, than embroidery. I love sewing as much as I love hand stitching, so I decided to change this blog's name to one that would cover both activities and reflect more what can be found here. Not everything I'll show will be of teal color :), but since I love this one I decided to have it in the name. Now, I'm working on the new layout and soon there should be the post on my current work. Cheers, Paulina

Friday, February 27, 2015

Minky Baby Quilt

Hello,

Ok, so after a long, long silence I'm trying to resurrect my blog once again. I didn't give up on embroidery and sewing but I couldn't find the time to document it all and post on the blog. Let's hope this year I'll have more time on both.

In January we welcomed a new addition to our family and now I'm a proud mama of two boys :) (the older is 6 years old now). And I'd like to show you baby quilt I was working on when I was pregnant. I didn't manage to finish it before my son's arrival, but I just did it now, so it's only 1 month delay. Not so bad.

Some time ago I found a tutorial for making baby quilt and I loved the pattern, so it only waited on my list of things to be done till the chance comes up. And here it was. In case you're interested you can find the tutorial here. The tutorial is made to use Layer Cake squares, I didn't have those, so I just cut the pieces from fabrics in my stash.

I decided to use Minky as the back of the quilt. I was a bit worried how quilting of such fabric would look like and if it's not too hard for me. But fortunately, it turned out it's quite easy to work on and I'm really pleased with the results. Minky is very soft and warm and so nice to sneak under that I guess we'll be both sleeping under it :). Minky is quite expensive, at least here in Poland where I live, but in my opinion it's worth spending money on such a special occasion as new baby in the family. It's perfect for various baby items.

Thursday, January 2, 2014

Mini Log Cabin Sewalong

Hello,

It's a bit terrifying how fast the time goes by. The last post I put here was almost one year ago, which for the Internet seems like ages. Hopefully, this 2014 year will be more fruitful for this blog, which also means will bring me more sewing and embroidery.

With this said, I'm happy to write I signed up for 2014 New Year Sewalong at SewCanShe. This week's assignment is to gather the fabric. I decided to choose yellow and green fabrics from my stash. Oh, the Sewalong is to make Mini Log Cabin blocks and use them for anyhting. I thought about doing cafe curtains with those. We'll see how it goes. There's also group created on Facebook, so I believe it will be a lot of sharing and fun.

Here are the fabrics I chose:

If you're interested in taking part in this here's the logo and link:

 photo coversquare_zps5d0586a6.jpg

Happy New Year :)!!!

Tuesday, February 5, 2013

Zig Zag Baby Quilt

Hello All!

For some time I've been working on baby quilt that I'm going to give to my first and only nephew :). He was born in December. Unfortunately, me and my son were sick (one time me the other him), so we couldn't go to visit my brother and his little baby. Hopefully, we'll go through the cold soon and will meet with them. Anyway, here's the gift I made for them.

I decided to make Zig Zag quilt as when I saw some on the Internet they look great for me. Here's the great tutorial I found at Bee Square Blog.

It measures 115x120cm (app.45x47inches). I wanted it to be colorful and chose green, blue, yellow and navy blue colors. I searched through some „baby” fabrics and used these:

blue colors: Aeronauts in Primary, Circle Toss in Earth from Robert Kaufman

green colors: Birds in Green, Baloons in Primary

yellow: Pinhead in Citrus

navy blue: Owl Be Your Friend in Earth from Robert Kaufman

green binding: Pinhead in Kiwi

For the back I bought flannel Itty Bitty Mosaic in Blue as it will be soft and cosy for little baby.

By the way I just noitced I haven't shown here the finished baby quilt I made for my son. So, here it is now.

This way I have two baby quilts made so far.

I'm linking this to:

Cheers!

Sunday, December 23, 2012

Merry Christmas !!!

For these special days, when we remind the God became a child to show us His love, I wish to you all Joy, Peace and Hope in every day of your life. And of course I wish you also only good stitches :).

Merry Christmas !!!

Tuesday, December 18, 2012

[WIP] long & short stitching part 2

I've been fighting with cold and illness for 2 weeks. And because of no good results I'm forced to stay at home for this week. And what can you do when you have to sit under the blanket all day? Yes,... you can catch up with blog writing :).

Today, I'll show you some photos with long&short stitching progress. Since the last time I showed it here, I did the outline for all 3 flowers, finished one petal and now I'm working on the second one.

To be honest, it goes so slowly because this embroidery intimidates me. I wanted to try it out and I do want to finish this project, but I'm afraid that I don't have the skills enough to learn it. It resembles painting to me, where you need that talent to choose right colors and match them in right way. I wasn't good at painting, so this one may be tough to me as well.

In Hardanger, which I did a couple so far, it is easy. You know exactly where the needle has to be put. Here I have to ponder for minutes sometimes, where to stitch and even when I decide I'm far from being sure it is right place. But I'm not giving up :).

Cheers and hopefully more progress soon :).

Monday, November 19, 2012

Craft and kids

Looking at some crafty blogs and also knowing this from my own experience, I guess it is always only a matter of time when craft and kids come together. My son is 3 and half years old and recently he started to have some interest in what I'm doing. Of course, I have no idea how this will evolve when he gets older but I hope at least he will learn that it's good to have some hobby :).

One of his plays involves my sewing machine but it is more about moving and changing variety of buttons than the actual sewing (bth do you know it was him changing the settings when I thought the machine was broken?). However, he tried hand sewing recently. He saw me working on the embroidery piece and wanted to try himself. So...I gave him a big tapestry needle (wanted to avoid sharp one), put a piece of Hardanger fabric on the hoop, prepared the threads and off we went. This is the result that I think is still the "work in progress" piece :).

Unfortunately, the fact he had his own hoop didn't mean I could work on mine. There still needed to be someone to hold the hoop, while he was navigating with needle. Well, but it was fun to look at him anyway :).

I'd love to hear of your experience with kids. What was the craft they enjoyed, what was the craft that came up to be a real fun for them? I guess it is a good offer for those rainy and snowy cold days that are coming when you have to spend majority of the day at home. Please, share with your thoughts.

Sunday, October 28, 2012

[WIP] long & short stitching

Recent months were hardly productive for me when it comes to stitching and sewing. There's no explanation to it other than - it's just how life goes on. Little duties here and there and after 3 months you realize time passes by and you forgot about the needle.

In July I wrote you here that I was going to learn long & short stitching. I started it a bit during my holidays in August and this is what I did so far. This post is a sign that I may continue working on this :). Today we had a first snow, it became quite cold - in general the weather encourages to stay at home. So, there is a chance my weekends will be occupied with stitching at least a bit.

I also have some plans for another baby quilt as my brother and his wife are expecting a baby in December. Unfortunately, my sewing machine got broke, so I need to have it repaired first.

Ok. Needle, where are you? Neeeedle?

Monday, September 24, 2012

September FNSI - not much done :(

I signed up for the past Friday FNSI and It's so bad I didn't do much then. I had plans to continue this quilt. Unfortunately I had to change plans as Saturday was an early wake-up. I needed to go to a doctor with my kid, and as I'm really bad morning bird, I couldn't sew long at Friday night. So, the only thing I managed to do is to cut the binding for the quilt.

A little better is that I did some sewing on Sunday afternoon. All the sandwich quilt is now sewed and I'm left with binding. Hopefully, the next FNSI will be better.

Cheers, Paulina

Saturday, July 7, 2012

Long & short embroidery - getting ready

There's been a lot about sewing here recently and I think it's highest time to come back to roots of this blog, i.e. embroidery. I believe I mentioned once I want to try out long and short stitching. Today, I finished preparing the fabric, the pattern and put it onto the hoop. The fabric is linen (Zweigart), pattern take from Trish Burr book: Long and Short Stitch Embroidery: A Collection of Flowers

To transfer the pattern I used transfer pen from Prym. You trace the pattern on the transparent paper and then iron it onto the fabric. The minus of such pen is that it's not removable, hence cannot be used for each embroidery. But for this one I guess it'll be fine as the thread will cover it all.

I'm a little anxious how I'll handle this type of stitching. It reminds me of painting and I was never good at that. But maybe this is because I used brush instead of needle. We'll see. It's the embroidery I wanted to try for a long time. In fact I just searched through the emails and I bought Trish Burr's book in 2008! Such a long time to start trying. But now it is the right time. In fact I'm starting now :). Cheers!

Wednesday, July 4, 2012

FMQ tablemat

And the short update to the latest post. I finished the binding for the tablemat I sewed and now it decorates my table. I made this one entirely from the scraps. The grey piece is linen that I bought once to some embroidery project but I didn't do it in the end.

As I mentioned in the previous post, I wanted to try free motion quilting and made this tablemat for that. I can tell now that it is very, very hard, but also after a while of quilitng I had a feeling that the sewing machine and the needle starts to listen to me :). So, I guess I'll need to think of some new project for practicing. Maybe, this time some smaller potholders or rug mugs...

I'm linking this one to JAQS Made by Me linky party:

Monday, June 18, 2012

June FNSI results

I still don't have the Internet but it won't stop me to post the results here as I promised :). I decided to finish the work on the tablemat. I did all the layers some time ago and pinned them together but I couldn't move on with quilting them. The main point to make this tablemat was to exercise and try free motion quilting. I did some of that on other fabric pieces to get a feeling but still I was worried how it would come out. But, if you don't try you're not going to be better, so finally I started free motion quilting on the tablemat. Last Friday night I finished that all.

SewCalGal blog has the year long event called Free-Motion Quilt Challenge. Each month there a different expert showing how to learn and make various free-motion patterns. In January there was this leaf pattern shown and I thought it would be good to make on my piece:

Here's the centre square sewn together

and the whole tablemat:

Now, I need to make the binding and it will be ready.