Showing posts with label hardanger. Show all posts

Thursday, August 27, 2015

[WIP] Golden Hardanger Doily

It's been a long, long time since I showed any embroidery. So, it's highest time to change that :). I'd like to show you what I've been working on for some time. It's my favorite, lovely Hardanger. The pattern comes from Yvette Stanton's book: "Elegant Hardanger Embroidery" and it'll be square doily. However, I decided not to use classic white colors, as seen in the book but instead to try this pattern on light yellow fabric and stitch it with dark gold thread. There's a lot to stitch and then cut, so I have no idea when I finish it but whenever I have a couple minutes here or there, I try to stitch. It's a small project so it's easy to take it wherever I go.

The doily will be around 28x28 cm. Materials I use: Zweigart Lugana light yellow fabric (color nr 274); DMC Pearl Cotton nr 5 and 8 dark gold (color nr 783).

Friday, November 11, 2011

Hardanger tablecloth {completed work}

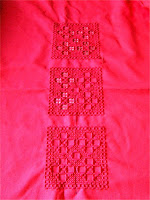
Finally, I finished Hardanger tablecloth. When I look back in my posts I started doing this one in May, so it took me 1/2 year to make it. The tablecloth measures about 1,3m x 2,4m and it has the embroidery in the centre. As it is so big, the emmbroidery looks tiny, but in fact it required quite a lot of work to finish it.

I have always the same problem with stitching that I think it will be something fast and simple and it turns out quite the opposite. But hey, we're not doing this to make the time records, right? I spent good time working on this one and this is what counts.

I still have this red fabric in my stash, so will make more of such goodies, but this time wil need to think of other pattern. I'm also planning to make some sort of border around the edges.

And I just finished this tablecloth in time to link it to Celebrate Color that finishes this month.

Wednesday, October 5, 2011

Work in progress

The tablecloth I've been working on for some time is almost on the finish. I have one square left for needle-weaving. The original pattern I wanted to do changed slightly over time. I thought of doing all squares the same with greek cross filling but as I started the first one routine took over and without thinking I did something else. So I was in a way forced to make changes, but still the center square will be with greek cross.
I'm also thinking whether to add some sort of border to the edges of the tablecloth. I wanted to keep it simple so I thought of 3 squares in the middle only but now I'm wondering if to add some more embroidery.
And once it's done I'll have to think of some better photographer than me! This fabric is red, threads are red and I have no idea how to make it look the same on the photo as it is in real.

Monday, May 16, 2011

Mistakes happen

Recently I started new Hardanger embroidery, but a mistake happened. There is a lot of thread counting when you start hardanger, as you have to place the pattern somehow on the fabric. And I did it twice, made sure not to make a mistake...but I did. When I saw what was wrong, I only thought this couldn't go right, how the heck did I count those threads the first time? Here's something for you so you might say - how did she count those threads? The left side is the good one. Those squares should meet right as the navy blue line is. As you can see on the right side they obviously couldn't meet.
But, when you stitch you have to be veeery patient person - so am I. I calmly removed the threads and started all over again. Live.

Friday, January 21, 2011

Fabric and threads for Hardanger

When doing the current project - i.e. another pillow with hardanger, I thought of making some sort of step by step tutorial in case any of you would be interested in trying hardanger. So, this is the first part of it.
Before you start any kind of embroidery you need to have two things - fabric and threads. For hardanger the fabric has to be the even weave type. The essential part of this embroidery is removing part of the threads from the fabric so to create the pattern and only the even weave fabric enables that. So far I had the fabrics of two manufacturers: DMC and Zweigart. DMC offers good quality fabrics for a decent price, Zweigart ones are much more expensive but I believe this comes with a better quality. Also Zweigart offers much bigger variety of colors. When you need colors like red, dark green or brown I think only Zweigart offers such.
Another thing about fabric is the number it has. You may see something like 22ct, 25ct and it stands for the number of threads to the inch. This means that the higher the number is the more dense the fabric you get. Also, the same pattern will become smaller on the more dense fabric. The fabrics with smaller number should be easier to embroider, however I would not buy the fabric with smaller number than 20ct. This one is loose enough to cut the threads easily and I'm afraid that the ones with a smaller number wouldn't look nice for such things as a tablecloth or a pillow. To compare - the ecru fabric on the photo is 20ct, the red one 25ct.

Now, the threads. If you read some books you'll read about pearl cotton. It's a thread with 2 twisted stands. You can also read it's doubled mercerised. Till today I had no idea what it means but for purposes of this blog I decided to check :). Here's what you can find in Wikipedia:
Mercerisation is a treatment for cotton fabric and thread that gives fabric a lustrous appearance. The process is applied to materials like cotton or hemp.
The threads also have its numbers: no.3, 5, 8 and 12 - the higher number the thinner the thread. For hardanger you need two sizes of the threads. The size of thread depends on the count of the fabric you'll choose.
As a less expensive replace for pearl cotton I used DMC Petra thread with quite good effect.

Friday, December 31, 2010

Closing 2010


At the end of the year it's good to have some finished stuff, so we can meet the New Year with the new things in mind. That's why I thought that on this very last day I'll show you the pillow I made recently. You could see the progress in the previous posts and now it's just the right time to show the outcome.


I had the plan to use as many stitches as possible so I could learn something new, but after trying a couple of them my nature revealed. That is I like simplicity - in result the pattern on the pillow is quite simple, only a few stitches used. By the way, here you can also see that I like the symmetry as well :).

To sum up, in the centre you can see the greek cross filling, the borders are made with herringbone stitch, the rectangles in both sides - fan stitch. I found all of the stitches in STITCH magazine. In the magazine they were used for other Hardanger project (very beautiful btw).


With the New Year coming I have a new stitching in mind. I'll be boring but this will be Hardanger again and pillow again. However, I'll try to put put some more posts with the progrees, so anybody interested will be able to see Hardanger step by step.
And last but not least - I wish everybody the New Year to be full with fun stitching and cool projects!

Tuesday, December 21, 2010

Greek cross pattern

Today I have a short post, as I only wanted to show you the greek cross pattern. It looks very nice and doesn't make a lot of time to make. I also like how the borders look. I found this pattern in Stitch magazine (issue 59).


The rest of the embroidery coming soon :).

Thursday, December 16, 2010

Some blue threads...

Nothing (or hardly anything) encourages to write posts as a new follower. Especially if this is the first one :). Jennifer, WELCOME here.

So this post will be to begin about my recent embroidery piece I've been doing. I thought of a small and quick embroidery. I found a project in Stitch magazine with many interesting stitches, so I decided to play along with them. I don't have a ready pattern, I will use the stiches randomly and will see how it turns out.

For the beginning I decided on using herringbone stitch and greek filling. Herringbone stitch is very useful if you want to create some kind of "border" for your embroidery. In my case it'll be at the top and the bottom. It looks really nice and is easy to stitch:

The greek cross filling is a Hardanger motive. Here you can see the very small part of it. What you can see are in fact only the kloster blocks. They are the basis for Hardanger embroidery. When all the kloster blocks are ready, then some threads inside it are pulled out and the remaining ones are used to form some shape - this will be our Greek cross in the end.

Oh, and the thing I should have mentioned at the beginning - The piece of fabric with the embroidery I'm making will be a part of a pillow. Making a pillow is a good thing to increase my sewing skills.

Thursday, October 22, 2009

How the fascination began....


As the "big thing" is still in progress (yes, slowly but steadily the end is coming) I thought of doing some reminiscence. And maybe it's autumn time that makes me think about the past...Anyway here's my first hardanger thing I did: little bags for Go stones. It had to be small & simple, so I could get the grasp of hardanger embroidery. This was my first hardanger lesson and I did it quite well. Not to mention that Hardanger intrigued me so much that I sank deeeeeply in it. I have ongoing plans to try out some other types of emroidery, for example long and short stitch one, I even bought some books about them, but still when I have some free time I always find a new pattern or get a new idea to do it in hardanger.

Bags for Go stones - sounds like I wanted to boast about them. As a matter of fact they can be used to store anything, but in my case I did them exactly for what they're called. More or less in the time when I got a book to learn Hardanger my dear bought this game and we needed something to store the stones used for the game. The reason was perfect, so I took the needle and produced this piece.

Now, some details about the bags. As I wrote above they're quite small: 12cm wide, 15cm long (4,7inch / 6inch accordingly). The square hardanger pattern is about 4,5cm (1,8inch). The pattern consists of woven bars only (some of them are with picots), so it's a very good one to begin with. I also did holes for ribbon in hardanger.


Friday, October 9, 2009

First Big Hardanger Project


After a couple of small projects that I used mostly as a way to learn Hardanger there's come a time to do something big. Tablecloth 217cm long and 146cm wide. I took the pattern from DMC leaflet, however I modified it a bit. The modification though meant simplifying the pattern, otherwise I'd have to spent ages doing it. Either way, It takes me too much time even when I got rid of some patterns.


All the kloster blocks are done, now it's time to do the part that in my opinion requires the most patience - that is cutting the threads and finishing it with needle weaving. There's many of these little squares that need to be cut out and now I doubt if I finish it by the end of this year. On the other hand, now when I see how this tablecloth will look when it's done I have more and more enthusiasm to finish it as quick as possible. I want to have it on my table finally!


Traditionally Hardanger is made on white fabric with white threads as well. However, once I saw the project with two-coloured threads and it made me feel - this is it. This project is a variation about pale and dark violet. And I recommend to anybody that works with Hardanger to play with two colours as the effects are really nice. So far I've always chosen to do the kloster blocks (thicker thread) with the brighter colour and the insides (thinner thread) with the darker one. Though, maybe it would also be interesting in reverse.